United Empire of Earth · Naval Communications Division
UEE QLINK// QUANTUM LINK COMMUNICATIONS SYSTEM
Operations & Configuration Manual
MANUFACTURED BY KELEUS INDUSTRIES
SPONSORED BY THE 22ND EXPEDITIONARY FLEET
This manual covers installation, Discord identity authentication,
callsign assignment, organization configuration, radio setup,
and operational use procedures for all fleet personnel.
DOCUMENT REV 1.8 // FOR DISTRIBUTION TO ALLIED ORGANIZATION LEADERS & MEMBERS
KELEUS INDUSTRIES · COMM-SYS-OPS-1.8 · 2954 CE
▸ TABLE OF CONTENTS
UEE QLINK // QUANTUM LINK · KELEUS INDUSTRIES · COMM-SYS-OPS-1.8
Sponsored by the 22nd Expeditionary Fleet · Naval Communications Division
A Discord account — used for identity and organization membership
Active internet connection
Installation
Download UEEQLink.exe from your organization's distribution link or the official release page.
Place the EXE anywhere on your PC — no installer needed. A good location is C:\Games\UEEQLink\.
Double-click UEEQLink.exe to launch. Windows SmartScreen may prompt you — click More info → Run anyway.
The application opens the Settings window on first launch. This is your main configuration hub.
ℹ AUTO-UPDATE
QLink checks for updates automatically every 15 minutes while running. When an update is available you will be prompted. The application restarts itself — no manual download required.
2 — Logging In with Discord
QLink uses Discord OAuth to identify you. Your Discord account is your identity on the network — no separate account or password needed.
In the Settings window, locate the ACCOUNT section at the top.
Click the LOGIN WITH DISCORD button.
Your default browser opens to Discord's authorization page. Log in to Discord if prompted.
Click Authorize to grant QLink read access to your username and server list. QLink never receives your password.
The browser tab closes automatically and your Discord username appears in Settings — login is complete.
⚠ KEEP THE BROWSER OPEN
The authorization handshake completes locally. Do not close the browser before Discord redirects — the login will time out and must be retried.
ℹ SESSION LENGTH
Your session is valid for 30 days. After expiry you will be prompted to log in again. You do not need to re-authorize Discord every launch.
3 — Setting Your Callsign
Your callsign is the name all other users see — in the Live Roster, frequency presence lists, and the ATC overlay. Choose something that clearly identifies you within your org.
In Settings find the CALLSIGN field in the Account section.
Type your callsign (e.g. EAGLE-1, ANVIL-LEAD, GHOST-7).
Settings auto-save — no separate Save button needed for this field.
💡 CALLSIGN CONVENTION
Keep callsigns under 12 characters so they fit cleanly in the HUD. Agree on a naming format org-wide (e.g. WING-NUMBER) so members can identify each other instantly during ops.
4 — Organization Setup (Org Leaders)
This section is for the Discord server owner or administrator registering their organization with QLink. Members do not need to perform these steps.
⚠ PREREQUISITES
You must be logged in with Discord (Section 2) before following these steps. You must be the owner or have the Manage Server permission on your Discord server.
Step A — Add the QLink Bot to Your Discord Server
The QLink bot allows the app to read your server's role list and verify member access. It requires no message permissions.
In QLink Settings, go to the ORGANIZATION section.
Select your Discord server from the dropdown (populated automatically from your logged-in account).
If the bot is not yet in your server, click ADD BOT TO SERVER — your browser opens to Discord's bot authorization page.
Confirm your server is selected, then click Authorize.
Return to QLink. The bot status should now show as present. If not, click Refresh.
ℹ WHAT THE BOT DOES
The bot is read-only. It does not post messages or manage channels. Its sole purpose is to let QLink verify which Discord roles each user holds when they connect.
Step B — Create Your Organization
With your server selected and bot added, click CREATE ORGANIZATION.
Enter a display name (defaults to your Discord server name — customizable).
Click CREATE. Only one organization can be registered per Discord server.
Step C — Configure Member & Admin Roles
QLink Role
What it means
Who to assign
Member
Can see and load org radio configs. Connected to the org's shared network.
All general members who will use QLink.
Admin
All Member abilities, plus: create, edit, and delete org radio configs, Priority Speaker (can break through an active transmission), manage org settings.
Squadron leaders, FCs, officers — anyone who needs to override comms or manage loadouts.
In the Organization panel, select the MEMBER ROLE from the dropdown (e.g. Member, Pilot, Verified).
Select the ADMIN ROLE (e.g. Officer, Commander, Staff).
You may assign multiple roles per level — a user with any listed role gains that access.
Click SAVE to push the configuration to the QLink server.
💡 ROLE STRATEGY
Leaving the Member role field empty means any member of the Discord server is treated as a QLink Member. Fine for small orgs. For larger orgs assign a specific vetted role to restrict access.
Step D — Share QLink with Your Members
Share the UEEQLink.exe download link in your Discord.
Direct members to Sections 2–5 of this manual.
Remind members their Discord roles must be assigned before they log in to QLink.
5 — Connecting to the Network
Once you are logged in and your callsign is set, you are ready to connect to the QLink voice relay network.
QLink connects to a centrally managed, secure UEE network infrastructure — no server address or manual configuration is required. The connection endpoint is handled automatically by the application.
Click the green CONNECT button. The status indicator changes to CONNECTING… then CONNECTED when the handshake is complete.
The HUD Overlay will appear on screen automatically after a successful connection.
You are now live on the network. Other connected members appear in the Live Roster.
ℹ RELAY SELECTION
QLink automatically selects the lowest-latency relay node and connects a shadow relay for redundancy. You do not need to choose a relay manually.
💡 DISCONNECT WHEN NOT IN USE
Click DISCONNECT when stepping away from an op. This removes your callsign from the Live Roster and prevents you from unintentionally transmitting.
6 — Personal Radio Configuration
The GENERAL tab in Settings is where you configure every channel you want to monitor or transmit on. Radios are listed in this tab — each slot is a full independent channel with its own frequency, PTT key, volume, and encryption.
The Radio List
Control
Description
Enable checkbox
Enables or disables the slot. Disabled radios are hidden in the HUD overlay and do not receive audio.
Name
Short label shown in the HUD (e.g. GUARD, TACT-1, FLEET). Keep it 8 characters or fewer.
FREQ (MHz)
The tuned frequency. Any two users on the same frequency can hear each other. Format: 0000.001 to 9999.990 MHz.
PTT
Push-to-talk keybind for this specific radio. Hold to transmit, release to stop.
SIM-TX
Simultaneous-transmit group. See the SIM-TX section below.
Output Channel
Stereo panning: Both (centre), Left, or Right. Shown as LR / L / R in the overlay.
VOL slider
Per-radio receive volume (0–100%). Does not affect your transmit level.
🔒 ENC
Opens the encryption passphrase dialog. See Encryption section below.
Group / Sub-Group
Organises radios into collapsible sections in the HUD. See Groups section below.
Frequencies
Frequencies are entered in MHz format (0000.001 to 9999.990). Internally QLink stores them in kHz for precision.
When you add a new radio, QLink generates a random frequency from the full range to prevent accidental collisions with other orgs.
Two radios hear each other only when they share the exact same frequency — this must be set intentionally.
A cross-org shared channel is created simply by both org admins typing the same agreed frequency into the relevant radio slot.
⚠ FREQUENCY COORDINATION
Share frequencies only with trusted parties. Anyone who knows a frequency and is connected to the same QLink server can hear unencrypted traffic on it. Use encryption (Section 6 — Encryption) for sensitive channels.
PTT Keybinds
Each radio has its own PTT binding. QLink supports three input types:
Input Type
How to bind
Keyboard
Click the PTT field and press the desired key (e.g. F1, Num1, CapsLock). Modifier keys (Ctrl, Alt, Shift) are supported.
Mouse
Click the PTT field and press Mouse Button 4 or Mouse Button 5 (side buttons).
Joystick
Click the PTT field and press any button on a connected DirectInput flight stick or HOTAS.
💡 COMMON PTT
The Common PTT (configured in Global Hotkeys) always transmits on whichever radio is currently selected (marked ▶ in the overlay). This is useful when you frequently switch between radios and want a single transmit key that follows your active selection.
💡 HOME PTT
The Home PTT always transmits on your home radio (marked ◀ in the overlay) regardless of which radio is currently selected. This ensures you always have a reliable dedicated key for your primary frequency — useful for ATC operators who navigate between frequencies but always need to reply on their home channel.
Audio Settings — Volume, Pan, and Mute
Volume slider — controls how loud incoming audio sounds on that radio. Independent of your system speaker volume.
Output Channel — pans audio: Both (centered), Left, or Right. Use this to place guard/emergency on one ear and tactical comms on the other.
Mute (🔇) — silences incoming audio without disabling the radio. You can still transmit. Muted radios remain visible in the overlay with a mute indicator.
Encryption
QLink supports optional AES-256 encryption per radio. When enabled, transmissions are only audible to users who have set the same passphrase on the same frequency.
Click the 🔒 ENC button on the radio you want to encrypt.
Enter a passphrase agreed upon with your group. It is stored locally only — never sent to the server.
Click OK. The lock icon turns amber to indicate encryption is active.
Every person on this channel must enter the exact same passphrase on the same frequency.
ℹ ENCRYPTION & ORG CONFIGS
Encryption passphrases are always local. When an org config is pushed to the server, the passphrase field is included so members can pull the full config — but each member must still activate encryption on their machine. Passphrases are never stored in plaintext on the relay server.
Groups & Sub-Groups
Groups organise your radio list into collapsible sections in the HUD. Sub-groups provide a second nesting level within a group.
Set Group to a label such as FLEET, GROUND, or COMMAND. All radios sharing a group name cluster under one collapsible header in the overlay.
Set Sub-Group for finer organisation within a group (e.g. group FLEET, sub-groups WING-1 and WING-2).
Leave Sub-Group blank to place the radio directly under the parent group header.
SIM-TX — Simultaneous Transmit
SIM-TX groups let you transmit on multiple frequencies at once with a single key — useful for relaying orders across several channels simultaneously.
On each radio to include, set the SIM-TX dropdown to a group letter (A, B, C…).
In GLOBAL HOTKEYS, assign a key to that SIM-TX group letter.
Holding that key transmits simultaneously on all radios in that letter group.
⚠ USE WITH CARE
Transmitting on multiple frequencies at once can disrupt listeners on all channels. Reserve SIM-TX for genuine broadcast situations — fleet-wide orders, emergency calls.
VOX — Voice-Activated Transmission
VOX activates transmission automatically when your mic level exceeds a set threshold — no key press required. It transmits on the currently selected radio (marked ▶ in the HUD).
In Settings find the VOX section and enable the toggle.
Adjust the THRESHOLD slider. Start around 30% — raise if VOX triggers on background noise, lower if it cuts off quiet speech.
⚠ VOX IN NOISY ENVIRONMENTS
VOX is not recommended for ops with lots of background noise (music, keyboard clicks, ambient sound). Use PTT in those situations to avoid accidental open-mic broadcasts.
7 — Global Hotkeys & Special Features
Global hotkeys work system-wide — they function even when QLink is not the focused window, including while Star Citizen is running in fullscreen.
Hotkey
What it does
Default
Overlay Toggle
Shows or hides the HUD overlay window. Also toggles the overlay between interactive (click-able) and pass-through (mouse clicks fall through to the game) modes.
Scroll Lock
ATC Overlay Toggle
Opens or closes the ATC expanded overlay that shows all active frequencies and who is listening or transmitting on each.
Not set
Common PTT
Transmits on whichever radio is currently selected (▶). Reassignable to keyboard, mouse button, or joystick.
Not set
Home PTT
Always transmits on the designated home radio (◀), regardless of current selection.
Not set
Radio Select Up / Down
Cycles the active selection (▶) through enabled radios without using the mouse.
Not set
Discord Mute
Automatically mutes and unmutes Discord in sync with your PTT key.
When you press PTT, QLink fires this key once to mute you in Discord.
When you release PTT, QLink fires it again to unmute you.
This prevents your QLink audio from bleeding into your Discord voice channel while you transmit.
Setup (required in both Discord and QLink):
In Discord: Settings → Keybinds → Add a Keybind → Toggle Mute — assign a key that is not used by anything else (e.g. F13 or Scroll Lock).
In QLink: Settings → Hotkeys → Discord Mute — set it to the exact same key you chose in Discord.
The key must be set to Toggle Mute in Discord (not Push-to-Talk). QLink sends one keypress on Tx start and one on Tx end — toggling Discord mute on and off automatically.
Not set
Isolate Audio Toggle
When Isolate Audio is on, only your Selected (▶) and Home (◀) radios play incoming audio — all others are silenced. This lets you simultaneously monitor your home channel and your ATC-assigned channel while ignoring all other traffic. Useful for ATC work or when operating across many active frequencies.
Not set
SIM-TX Groups (A–Z)
Each SIM-TX group can have its own dedicated hotkey for simultaneous multi-channel broadcast.
Not set
💡 DISCORD MUTE INTEGRATION
If you run Discord alongside QLink, this binding is strongly recommended — audio bleed into Discord is the single most common complaint from new operators.
The key you choose must be set to Toggle Mute (not Push-to-Talk) in Discord's Keybinds settings, and must be set to the identical key in QLink's Hotkeys panel.
QLink handles the rest automatically: one tap mutes Discord when your PTT goes down, one tap unmutes when it comes up.
8 — The HUD Overlay
The HUD overlay is a transparent, always-on-top window that sits over your game showing the status of all your active radios in real time. It is designed to be glanceable at a moment's notice.
Reading the Overlay
Indicator
Meaning
▶ (right arrow)
This radio is currently selected. Common PTT and VOX transmit on this radio.
◀ (left arrow)
This is your home radio. Home PTT always transmits here regardless of selection.
Blinking green dot (●)
You are currently transmitting on this radio.
Solid amber dot
Someone else is transmitting to you on this frequency (incoming audio active).
Frequency display
The tuned frequency in MHz, e.g. 121.500 MHz.
L / R / LR
Audio output pan: Left ear, Right ear, or Both.
🔇
This radio is muted (you are receiving but silenced locally).
🔒
Encryption is active on this radio.
Moving and Resizing the Overlay
Switch the overlay to interactive mode by pressing your Overlay Toggle hotkey (default Scroll Lock). In interactive mode a green [INTERACTIVE] label appears in the corner.
Drag the overlay to any position on screen while in interactive mode.
Drag the bottom-right corner to resize the width.
Press Scroll Lock again to return to pass-through mode — mouse clicks fall through to the game as if the overlay is not there.
Collapsing Groups
Click a group header in interactive mode to collapse or expand that group.
The overlay automatically resizes to fit the visible content when groups are toggled.
Even in a collapsed group, the selected (▶) and home (◀) radios remain visible so you always see your active channels.
💡 OVERLAY OPACITY
In Settings you can adjust the overlay opacity from nearly transparent to fully opaque. A setting around 80–90% works well for most monitors — visible without being intrusive.
9 — Live Roster Window
The Live Roster is a small always-on-top window that shows every callsign currently connected to the QLink server. It updates in real time as users connect and disconnect.
Opening the Roster
In the Settings window click SHOW ROSTER.
The Roster window appears and can be dragged to any position on screen.
Click HIDE ROSTER in Settings to close it.
Reading the Roster
Each callsign appears as a green chip. The count in the header badge shows how many users are currently online.
The Roster shows all users on the server — not just members of your org. Use it to quickly confirm your team is connected before an op.
If the roster shows — not connected —, you are not connected to the server yet (see Section 5).
10 — ATC Overlay
The ATC (Air Traffic Control) Overlay is an expanded second window that shows every active radio and who is tuned to each frequency. It is designed for coordinators, FCs, and ATC operators who need full situational awareness across multiple channels.
Opening the ATC Overlay
In Settings click SHOW ATC OVERLAY, or press the ATC Overlay Toggle hotkey if one is bound.
The ATC overlay appears as a separate draggable, resizable window.
ATC Overlay Modes
Mode
Indicator
Behaviour
Interactive
Amber [INTERACTIVE] label
You can click, drag, and interact with the overlay. Mouse input is captured by the overlay window.
Pass-Through
Grey [PASS-THROUGH] label
Mouse clicks fall through to the game. The overlay displays but does not intercept input.
Toggle between modes using your ATC Overlay Toggle hotkey or by right-clicking the overlay header.
Reading the ATC Overlay
Each radio channel is shown as a column with its name, frequency, and a live list of callsign chips for every user currently tuned to that frequency.
A callsign with a ▶ next to it means that user currently has that radio selected as their active transmit channel.
The overlay updates in real-time as users join, leave, or switch frequencies.
Moving a Pilot to a Frequency
In Interactive mode, right-clicking any callsign chip opens a MOVE [CALLSIGN] TO: context menu listing every radio in your config. Selecting a frequency sends a command through the server that automatically switches that pilot's active (▶) radio to the matching channel — no action required from the pilot.
💡 EXAMPLE — ATC HANDING OFF TO LSO
An ATC controller has two radios set up: ATC 1234.500 and LSO 2041.000. A pilot, VIPER-7, has just received approach clearance and needs to switch to the LSO frequency for landing guidance. The controller sees VIPER-7's chip in the ATC column, right-clicks it, and selects LSO 2041.000 from the Move menu. VIPER-7's client instantly switches their selected radio to the LSO frequency — they are now in the LSO column and ready for landing comms without needing to manually tune.
⚠ HOME RADIO IS PROTECTED
A Move command only switches the pilot's selected (▶) radio. Their home (◀) radio is always immune to remote move commands — pilots can never be moved off their home channel involuntarily.
💡 OPERATOR TIP
Bind the ATC Overlay Toggle hotkey to your HOTAS or keyboard. During an op you can flip the overlay visible, move a pilot in two clicks, and pass it back to pass-through — without ever leaving the game.
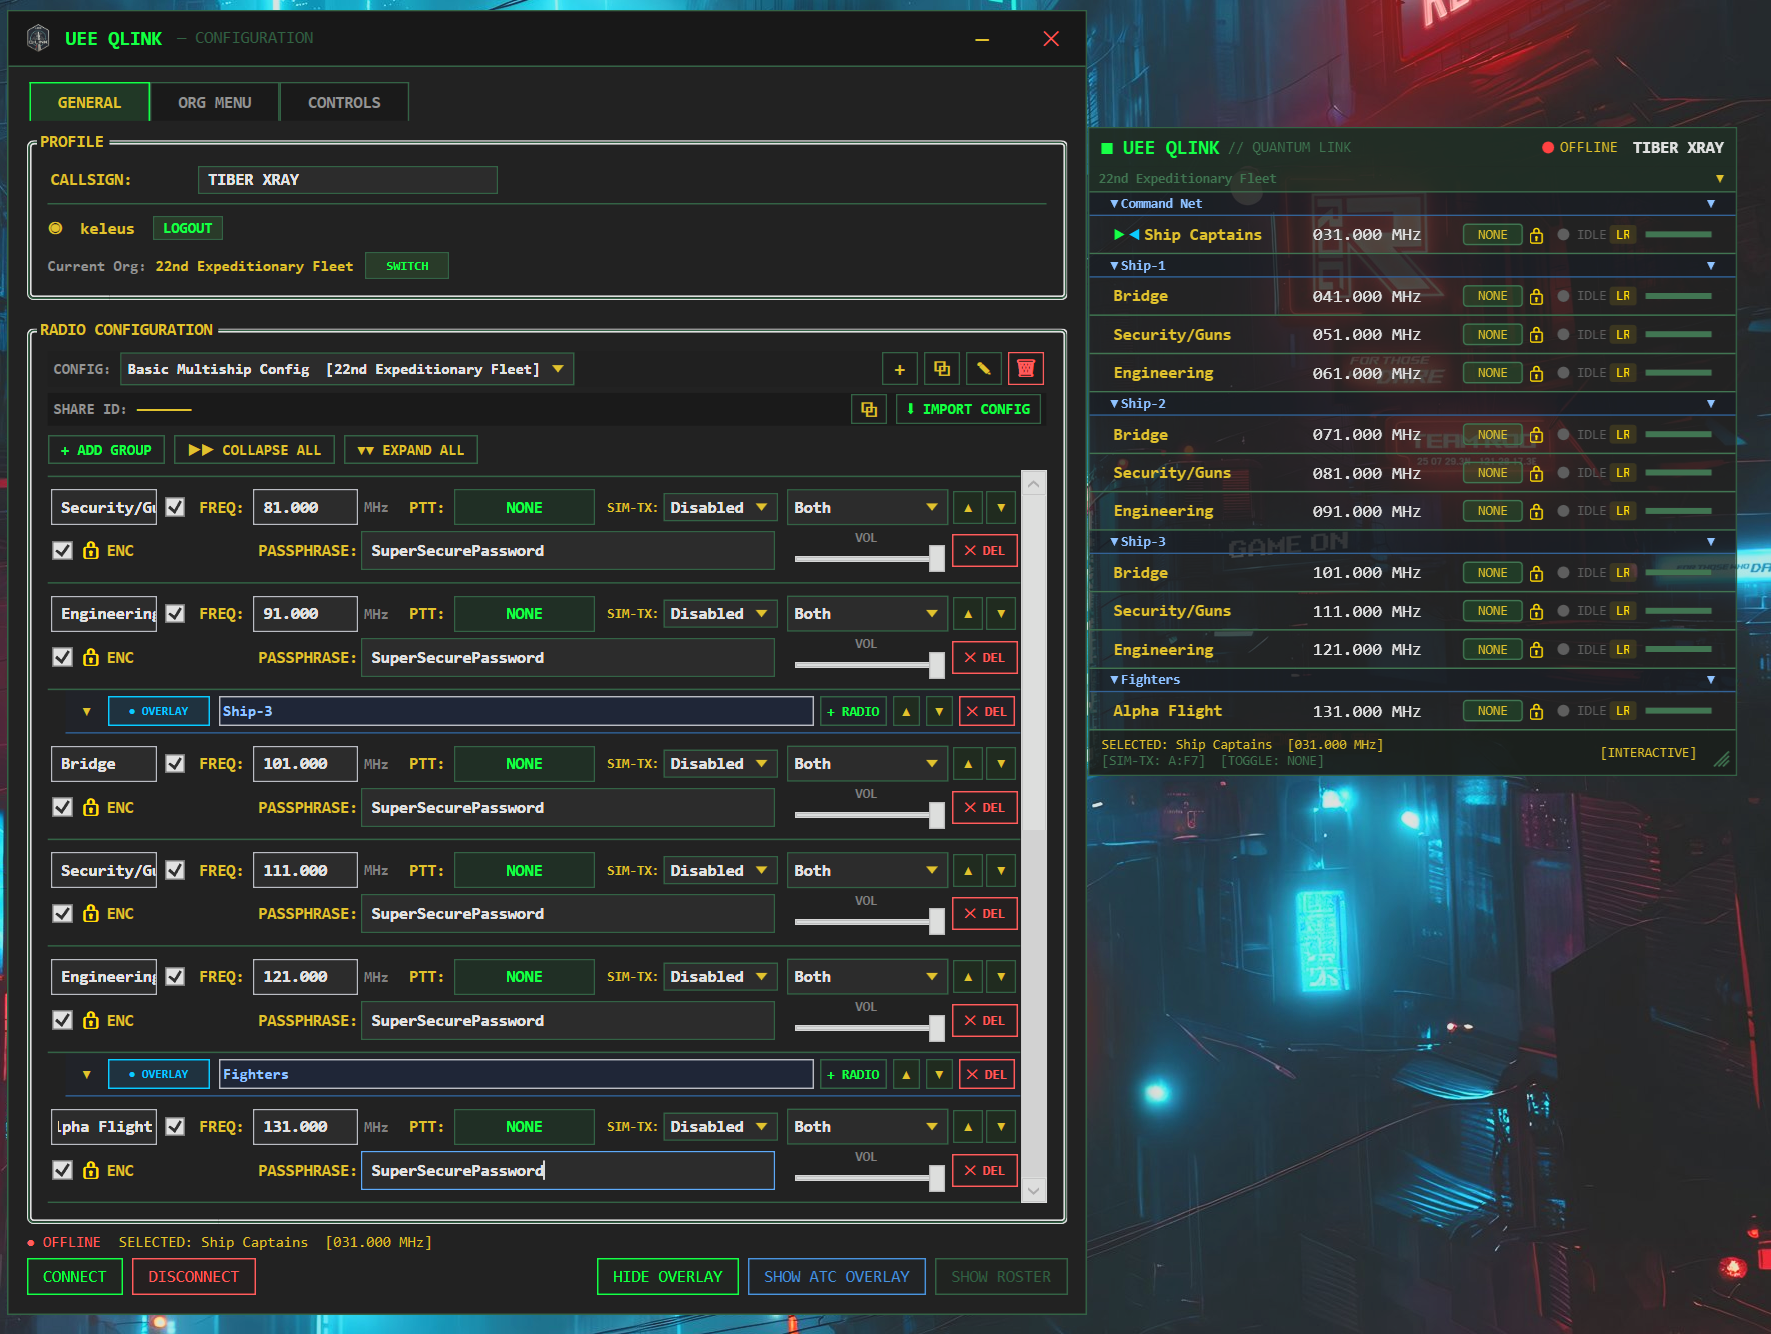
11 — Org Radio Configs — Shared Loadouts
Org Configs allow an admin to push a complete radio loadout to the QLink server so that all org members can load it with one click — ensuring everyone starts an op on the correct frequencies with the correct channel names and groupings.
Loading an Org Config (Members)
Connect to the network (Section 5). QLink will automatically detect your org membership via your Discord roles.
In Settings open the GENERAL tab. In the config dropdown at the top of the tab, org configs published by your admin will appear alongside your personal configs — simply select the one you want.
The radio list updates immediately to match the org config. Your personal settings (PTT keys, volume, output pan, mute) are preserved — only the shared fields (frequency, name, group, encryption) are applied.
ℹ PERSONAL OVERRIDES
PTT bindings, volume levels, output channel pan, and mute state are always local only — they are never overwritten when loading an org config. You can customise audio settings to your preference without affecting other members.
Creating & Editing Org Configs (Admins)
Org configs are built and edited exactly like a personal radio config — the only difference is where you save them.
In the GENERAL tab click NEW CONFIG. If you are an org admin, a prompt will ask whether you want to create a Personal Config or an Org Config — select Org Config. This is how all new org configs are created.
Give the config a name, then configure the radio list exactly as you would for a personal config — set frequencies, channel names, groups, sub-groups, and encryption passphrases for each slot.
When the loadout is ready, click SAVE TO ORG. The config is published to the QLink server and immediately becomes available to all org members.
To edit an existing org config, select it from the config dropdown, make your changes, then click SAVE TO ORG again to push the update.
Any org admin can create, edit, or delete org configs — members who next reload the config will receive the updated loadout.
Fig. 11-A — Basic Multiship Org Config · Command net + per-ship sub-groups with dedicated frequencies
Cross-Org Shared Frequencies
When coordinating with an allied organization, create a shared channel by both orgs setting the same frequency on the relevant radio slot. Both parties must also use the same encryption passphrase if the channel is encrypted. Coordinate the frequency and passphrase via a secure out-of-band channel (Discord DM, etc.) before the op.
12 — Quick-Start Checklist for Members
New to QLink? Use this checklist on your first session and before every major operation.
First-Time Setup (do once)
✓
Task
Reference
☐
Download and launch UEEQLink.exe
Section 1
☐
Click LOGIN WITH DISCORD and authorize
Section 2
☐
Set your callsign
Section 3
☐
Click CONNECT — no server address needed, infrastructure is managed automatically
Section 5
☐
Select your microphone and headset/speakers in the Audio section of Settings
Section 6
☐
Bind the Overlay Toggle hotkey (default: Scroll Lock)
Section 7
☐
Bind the Discord Mute key if you use Discord alongside QLink
Section 7
☐
Click CONNECT and confirm you appear in the Live Roster
Section 5, 9
☐
Load your org's radio config from the Configs tab
Section 11
☐
Assign PTT keys to each radio you will use
Section 6
☐
Test transmit/receive with a teammate
—
Before Each Operation
✓
Task
☐
Launch QLink and click CONNECT
☐
Reload the org config if your FC has pushed an update
☐
Confirm your callsign appears in the Roster
☐
Verify the correct radios are enabled and frequencies match the op briefing
☐
Check encryption is active (🔒) on any secure channels
☐
Press Scroll Lock to set overlay to pass-through before entering the game
☐
Perform a comms check — key up on GUARD and confirm your team hears you
Key Concepts Summary
Term
Quick definition
PTT
Push-to-Talk — hold a key to transmit on that radio.
Common PTT
A single key that transmits on whichever radio is currently selected (▶).
Home PTT
Always transmits on your home radio (◀), regardless of selection.
VOX
Voice-activated TX — transmits automatically when your mic level exceeds the threshold.
SIM-TX
Simultaneous transmit — one key broadcasts to multiple frequencies at once.
Isolate Audio
Hear only your Selected (▶) and Home (◀) radios; all others are silenced until you switch off. Lets you monitor your home channel and ATC-assigned channel simultaneously.
Org Config
A pre-set radio loadout published by your org admin — load it to get all frequencies in one click.
Encryption (ENC)
AES passphrase that scrambles audio — only users with the same passphrase on the same frequency can hear each other.
ATC Overlay
Full channel-status overlay showing who is tuned to each frequency.
Pass-Through
Overlay mode where mouse clicks pass through to the game instead of interacting with QLink.
ℹ GETTING HELP
If you encounter issues, contact your org's QLink administrator. Include your QLink version number (visible in the title bar or Settings window) and a description of the problem.
UEE QLINK // QUANTUM LINK · KELEUS INDUSTRIES · COMM-SYS-OPS-1.8
22ND EXPEDITIONARY FLEET · NAVAL COMMUNICATIONS DIVISION · 2954 CE